How-to: setup Gitlab repository
In this how-to, we setup an existing Gitlab repostory to with ADM. At the end of this how-to-guide, you will have an operational CI/CD-pipeline with which you can provision your Snowflake cloud database.
Connect Snowflake to ADM
-
Clone the repository to your local machine
-
Add the file environments/development.yml and fill it with the following contents. This will create an ADM-environment called development that ADM uses to connect to Snowflake.
{
  "name": "development",(1)
  "description": "Snowflake environment called 'development'.",
  "connector": "snowflake",
  "security": {
    "connector": "variables",
    "endpoint_variable": "DEVELOPMENT_SNOWFLAKE_ENDPOINT",
    "username_variable": "DEVELOPMENT_SNOWFLAKE_USER",
    "password_variable": "DEVELOPMENT_SNOWFLAKE_PASS"
  }
}
Setup variables
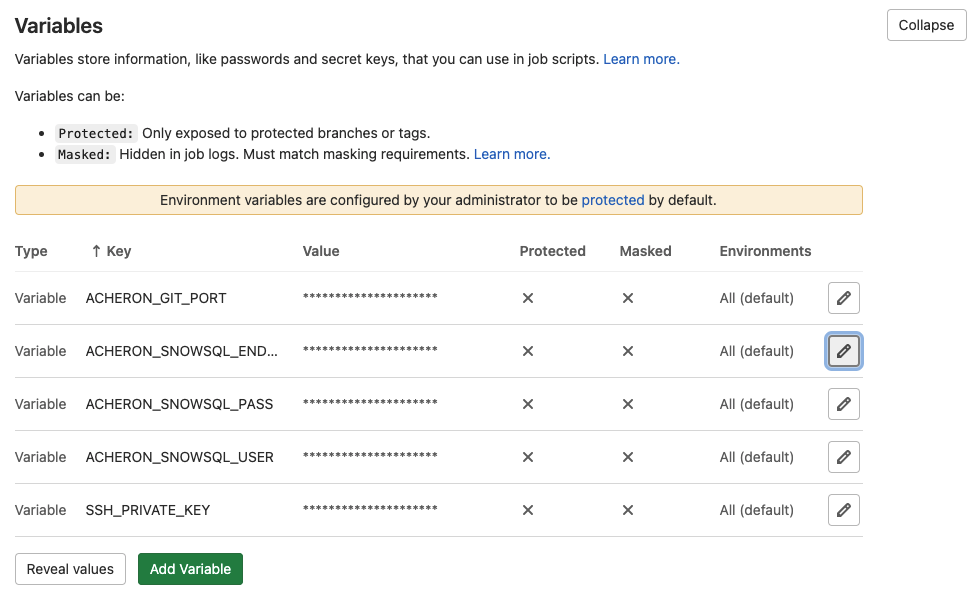
Next, we assign values to the environment variables that we defined in the previous step.
-
Login to Gitlab, and go to your Gitlab repository.
-
Go to menu:Settings[CI/CD > Variables] and add the following variables.
| Variable Key | Variable Value | Definition |
|---|---|---|
DEVELOPMENT_SNOWFLAKE_ENDPOINT |
development.eu-west-1 |
Name of the Snowflake account |
DEVELOPMENT_SNOWFLAKE_USER |
SF_ACHERON_AUTO_EXECUTER |
The name of the Snowflake user created earlier |
DEVELOPMENT_SNOWFLAKE_PASS |
<developments-snowflake-password> |
The password of the Snowflake user created earlier |
SSH_PRIVATE_KEY |
… |
SSH private key that will be used for Git actions like pull and commit. Supported formats are: ed25519 and RSA. The SSH key needs to be connected to a Gitlab User (Can be a service user), with rights on your repository. |
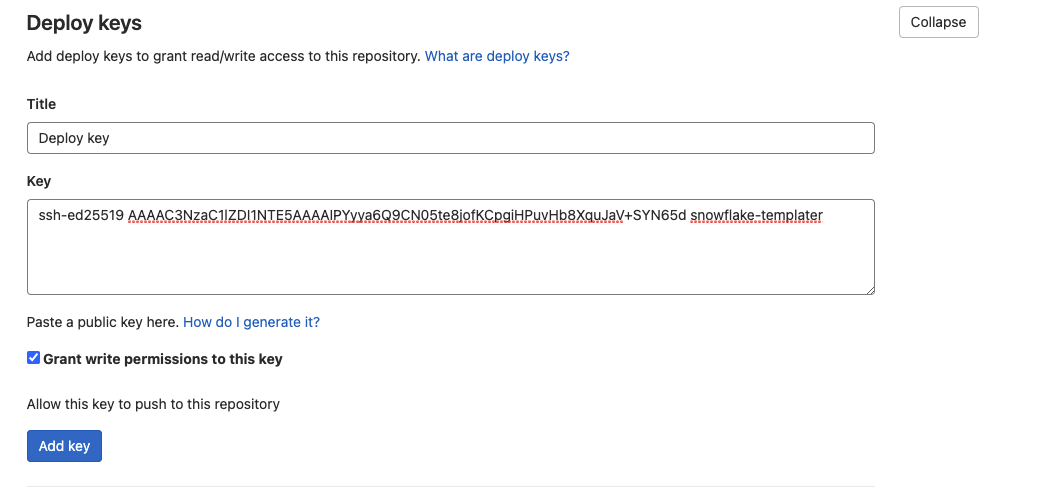
Add SSH support for writing back to repository
Next, we add SSH support for writing back to repository
-
Login to Gitlab, and go to your Gitlab repository.
-
Go to menu:Settings[Repository > Deploy keys] and add add a new ssh key.
-
Title - Give a key title - Example "Deploy key"
-
Key - Copy/Paste Key with SSH public key
-
Grant write permissions to this key - Check box
-
Create CI/CD pipeline
A preconfigured .gitlab-ci.yml file holds the configuration of the CI/CD steps. Add it to the root of your repository.
image: registry.gitlab.com/acheron-it/docker/acheron-database-manager/image:*.*.*-*.*.* (1)

stages: (2)
  - lint
  - template
  - dryrun
  - execute

before_script: (3)
  - shopt -s expand_aliases
  - source /etc/aliases.sh

lint: (4)
  stage: lint
  script:
    - echo "Linting ..."
    - linter
  except:
    variables:
      - $CI_COMMIT_MESSAGE =~ /Commit logs/

template: (5)
  stage: template
  only:
    - master
  except:
    variables:
      - $CI_COMMIT_MESSAGE =~ /Commit logs/
  script:
    - eval $(ssh-agent -s) # Start SSH agent for gitlab git actions
    - echo "Templating ..."
    - templater development

execute-dryrun: (6)
  stage: dryrun
  only:
    variables:
      - $CI_COMMIT_MESSAGE =~ /Commit new Container run results/
  script:
    - eval $(ssh-agent -s) # Start SSH agent for gitlab git actions
    - echo "Executing to Snowflake dryrun environment"
    - executer development-dryrun --commit-id=$CI_COMMIT_SHA
  when: on_success

execute: (7)
  stage: execute
  only:
    variables:
      - $CI_COMMIT_MESSAGE =~ /Commit new Container run results/
  script:
    - eval $(ssh-agent -s) # Start SSH agent for gitlab git actions
    - echo "Executing to Snowflake environment"
    - executer development --commit-id=$CI_COMMIT_SHA
when: on_success| 1 | Fill in the exact version number of the Acheron ADM container that you’re using. In case this is unclear, feel free to contact Acheron (info@acheron.cloud) |
| 2 | The steps that will be executed every time that a change is pushed to Gitlab - Gitlab CI |
| 3 | Mandatory scripts that need to be loaded before every CI/CD step |
| 4 | Lint-step evaluates the input files |
| 5 | Template-step renders templates to SQL-files |
| 6 | Dryrun-execution, executes SQL-changes on the Dryrun-Snowflake Account |
| 7 | Execution, executes SQL-changes on the desired Snowflake Account |
Run the CI/CD pipeline for the first time
-
Create a new branch
-
Add the ADM-license to the environments directory
-
Add templates to the templates-directory
-
Add a template-configuration to the input directory
-
See that the linter is working
-
Merge the branch
-
This will trigger the Templater to make a commit
-
The executer will execute your code to SF dryrun environment
-
The executer will execute your code to final SF environment
-