Explained: Templater stage
In the development phase of a data platform, the Templater offers increased building speed by rendering standardized SQL blocks from simple configuration files. In the deployment phase, SQL is optimized for searching, allowing data engineers to debug quicker, reducing their trouble shooting time. Last but not least, the Templater introduces a unique way of applying naming conventions that increases readability of sql.
Behaviour
The Templater makes sure that changes happening in the input directory are reflected in the output directory accordingly. Let’s take the following example.

The following series of events occured:
| 1 | A change to the input directory was made in commit '0000001' with the name "add warehouse to Acceptance" |
| 2 | The change triggered a 1st process that was succesfully completed (the Linting stage) |
| 3 | The change triggered a 2nd process that was succesfully completed as well (Templating stage) |
| 4 | The respective change to the output directory was made in commit '0000002' by the Templater |
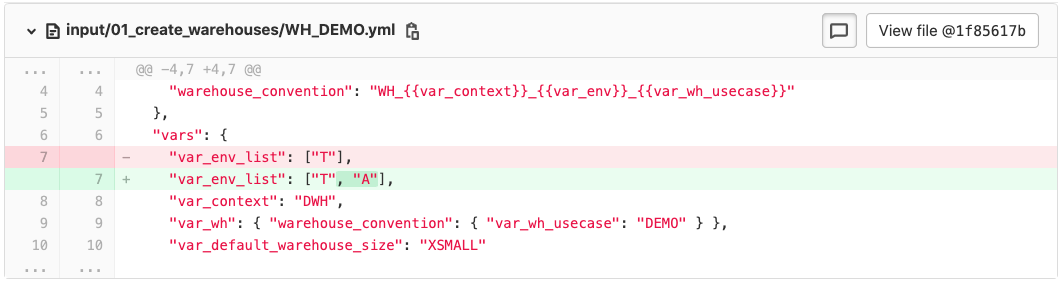
The contents of the commits gives a good idea how the Templater works. The change to the input directory looks as follows:
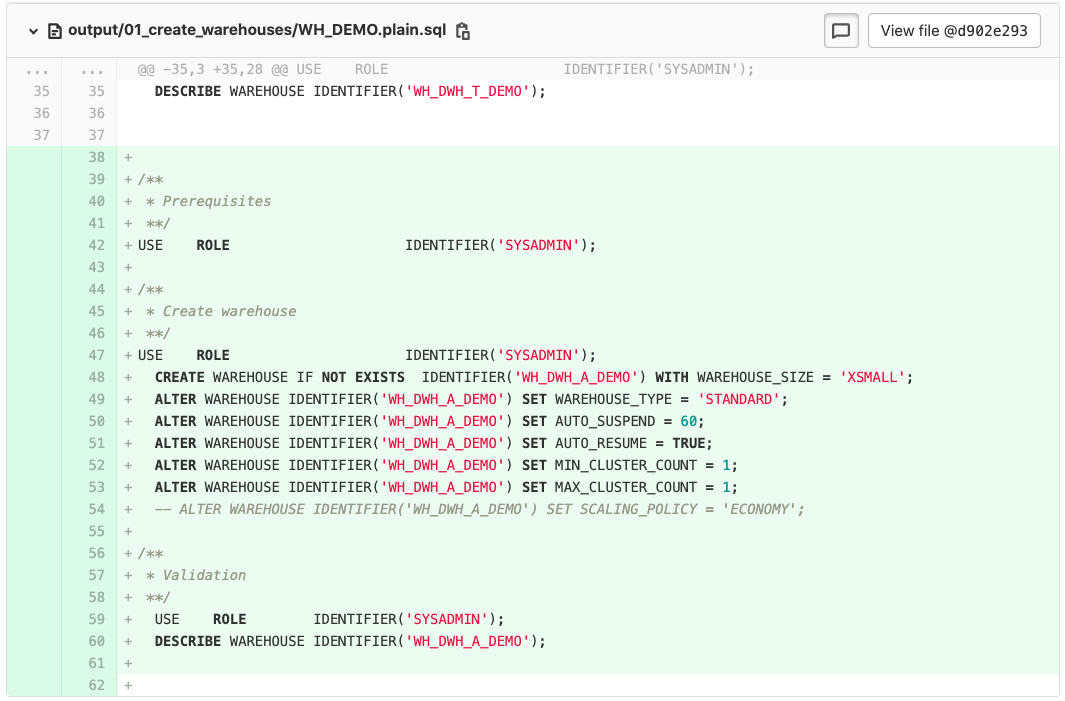
As a result, the Templater updates the output folder with the following change:
While we didn’t show the contents of the template being used to generate the SQL, we get a lot of clues about what happened here:
-
The message "add warehouse to Acceptance" of commit '0000001' matches nicely with the the changed line, where an "A" has been added after the "T"
-
The SQL-code generated by the Templater shows in the comments "Create warehouse" on line 45. Additionally, we see a "CREATE WAREHOUSE…"-statement on line 48
The use case we have shown here: a warehouse that was deployed to the Acceptance environment.
Rendering a Template to SQL
In the previous example, we illustrated how the Templater acts on a change to an existing file in the input directory. In this section, we zoom in on how the Templater acts on new files in the input directory.
Let’s say that the following file is added to the input directory.
{
  "template": "create_schema.sql.j2", (1)
  "vars": { (2)
    "var_env_list": ["T"],
    "var_context": "DWH",
    "var_rl_adm_type": "ADMIN",
    "var_db": "DB_DWH_T",
    "var_sch": "DWH_0_ADMIN",
    "var_enable_managed_access": "TRUE"
  }
}
The Templater performs the following steps:
| 1 | Load the referenced template (located at 'templates/create_schema.sql.j2') |
| 2 | Render the template to SQL given the listed variables |
Below is the contents of template 'templates/create_schema.sql.j2':
/**
 * Derived from template: {{ template }}
 *
 */

{% for var_env in var_env_list %}
/**
 * ENVIRONMENT: {{ var_env }}
 */
SET var_context              = '{{ var_context }}';
SET var_env                  = '{{ var_env }}';
SET var_rl_adm_type          = '{{ var_rl_adm_type }}';
-- We intentionally wrote this concatenated line. It will be rewritten in the next section
SET var_rl_adm               = 'RL_'||$var_context||'_'||$var_env||'_'||$var_rl_adm_type;
SET var_rl_sec               = 'SECURITYADMIN';
SET var_rl_sys               = 'SYSADMIN';
SET var_db                   = '{{ var_db }}';
SET var_sch                  = '{{ var_sch }}';

/**
 * Create schemas
 */
USE    ROLE                     IDENTIFIER($var_rl_adm);
USE    DATABASE                 IDENTIFIER($var_db);
CREATE SCHEMA IF NOT EXISTS     IDENTIFIER($var_sch){{ ' WITH MANAGED ACCESS' if var_enable_managed_access else '' }}
;

{%- endfor %}
Below is the result of the rendering process where variables between curly braces have been substituted.
/**
 * Derived from template: create_schema.sql.j2
 *
 */

/**
 * ENVIRONMENT: T
 */
SET var_context              = 'DWH';
SET var_env                  = 'T';
SET var_rl_adm_type          = 'ADMIN';
-- We intentionally wrote this concatenated line. It will be rewritten in the next section
SET var_rl_adm               = 'RL_'||$var_context||'_'||$var_env||'_'||$var_rl_adm_type;
SET var_rl_sec               = 'SECURITYADMIN';
SET var_rl_sys               = 'SYSADMIN';
SET var_db                   = 'DB_DWH_T';
SET var_sch                  = 'DWH_0_ADMIN';

/**
 * Create schemas
 */
USE    ROLE                     IDENTIFIER($var_rl_adm);
USE    DATABASE                 IDENTIFIER($var_db);
CREATE SCHEMA IF NOT EXISTS     IDENTIFIER($var_sch) WITH MANAGED ACCESS
;
To summarize, when a new file is added to the input directory, the Templater stage creates the respective SQL-file in the output directory. In the remainder of this documentation, we refer to a new input file that references a template as a template_configuration.
Need for efficient searchability
A data landscape is configured with SQL scripts. Over time, the amount of SQL-scripts grows, causing new changes to have a negative impact on either the deployment time or the coherence the scripts. Efficient searchability will minimize the negative impact on deployment time while keeping the coherence of the scripts intact.
When an issue presents itself in a data landscape where scripts are not properly managed, a data engineer will be tempted to make a small workaround to fix the issue at hand.
An example from practise.

A user files an issue that he/she has insufficient privileges to drop a table. A database administrator will debug the problem as follows:

1. Find what roles that are granted to the user. If a required role is missing, than:
  - Find the script where the role should have been assigned to the user
  - Either the script is correct, and it should be (re)deployed
  - Or the script is missing the statement. Add the statement, and commit the change.
    After a review, deploy the change.
2. Find the priviliges that are granted to the user through a direct role
  - Find the script where the privilege should have been granted to one of the roles assigned to the user
  - Either the script is correct, and it should be (re)deployed
  - Or the script is missing a grant-statement. Add the statement, and commit the change.
    After a review, deploy the change.
3. Find the priviliges that are granted to the user through an implicit role
  - Find the script where the privilege should have been granted to one of the roles assigned to the user
  - Either the script is correct, and it should be (re)deployed
  - Or the script is missing a grant-statement. Add the statement, and commit the change.
    After a review, deploy the change.

In order for the database administrator to perform this task efficiently, he needs to be able to find the responsible scripts in each of the three steps in a mouse click.

Because searchability is in many data environments poorly managed, debugging a problem and correcting the correct script, is a too big of a hessle. Instead, a data administrator queries the database to see what priviliges the user is missing. He creates a manual statement and deploys this script on the TAP environments.
SQL-optimization to the rescue
Efficient searchability forms the basis for debugging in SQL.
Generic SQL-statements that contain many variables score very good on reusability. However, searchability is soon lost.
Have a look at the first 5 lines from the previous example. Say we want to list all SQL-files that are related to 'RL_DWH_T_ADMIN'. While our previous rendered SQL-file should definitely be in the result, our search engine is not smart enough to understand that the last line actually states: SET var_rl_adm = 'RL_DWH_T_ADMIN'.
SET var_context              = 'DWH';
SET var_env                  = 'T';
SET var_rl_adm_type          = 'ADMIN';
-- We intentionally wrote this concatenated line. It will be rewritten in the next section
SET var_rl_adm               = 'RL_'||$var_context||'_'||$var_env||'_'||$var_rl_adm_type;
In order to make searchability efficient, the Templater will not allow for variables to still be present after rendering. Hence, after optimizing the previous rendered output looks as follows:
/**
 * Derived from template: create_schema.sql.j2
 *
 */

/**
 * ENVIRONMENT: T
 */

/**
 * Create schemas
 */
USE    ROLE                     IDENTIFIER('RL_DWH_T_ADMIN');
USE    DATABASE                 IDENTIFIER('DB_DWH_T');
CREATE SCHEMA IF NOT EXISTS     IDENTIFIER('DWH_0_ADMIN') WITH MANAGED ACCESS
;
With this optimization of SQL-code, searching for 'DWH_T_ADMIN' will not only match the relevant files, but also the exact line where a keyword is used. This is of huge value for debugging purpuses.
Defining naming conventions
Naming conventions improve readability of code, they speed up development and they help onboard new team mebers faster. Not strange that data engineers and architects agree on these conventions before they start developing.
Often, naming conventions are hidden in documentation:
The Context is a general name to refer to a database environt
An Environment is a one letter abbreviation referencing Development (D), Testing (T), Acceptance (A) or Production (P)
An identifier of a DATABASE has the prefix "DB" followed by the Context followed by an Environment. E.g. "DB_DWH_T"
An identifier of a SCHEMA has the prefix Context followed a sequence number followed by the name of the schema. E.g. "DWH_1_RAW".
An identifier of a ROLE has the prefix "RL" followed by the Context followed by the environemnt
We like to change that by capturing naming conventions in code:
{
  "naming_conventions": {
    "role_convention": "RL_{{ var_context }}_{{ var_env }}_{{ var_rl_type }}",
    "database_convention": "DB_{{var_context}}_{{var_env}}",
    "schema_convention": "{{var_context}}_{{var_sch_num}}_{{var_sch_name}}",
    "my_convention": "{{var_a}}_..._{{var_i}}_..._{{var_z}}"
  }
}
Line 7 shows the syntax of writing a naming convention of your own
Applying naming conventions
Let’s rewrite the template_configuration of Section template_rendering with naming conventions:
{
  "template": "create_schema.sql.j2", (1)
  "naming_conventions": { (2)
    "role_convention": "RL_{{ var_context }}_{{ var_env }}_{{ var_rl_type }}",
    "database_convention": "DB_{{var_context}}_{{var_env}}",
    "schema_convention": "{{var_context}}_{{var_sch_num}}_{{var_sch_name}}"
  },
  "vars": {
    "var_env": "T", (3)
    "var_context": "DWH", (4)
    "var_rl_adm": { "role_convention":      { "var_rl_type": "ADMIN"   } }, (5)
    "var_db":     { "database_convention":  {}}, (6)
    "var_sch":    { "schema_convention":    { "var_sch_num": "0", "var_sch_name": "ADMIN" }}, (7)
    "var_enable_managed_access": "TRUE"
  }
}
The Templater performs the following steps:
| 1 | The referenced template is loaded from disk |
| 2 | Naming conventions are loaded into memory |
| 3 | The variable "var_env" is added to the scope with value "T" |
| 4 | The variable "var_context" is added to the scope with value "DWH" |
| 5 | The naming convention "role_convention" is applied using variables "var_rl_type" and the variables in the scope, returning "RL_DWH_T_ADMIN". Next, this value is assigned to the variable "var_rl_adm", which is added to the scope. |
| 6 | Likewise, variable "var_db" is added to the scope with the resolved value "DB_DWH_T". |
| 7 | Likewise, variable "var_sch" is added to the scope with the resolved value "DWH_0_ADMIN". |
As this example illustrates, variables are added to the scope in the order as they are defined. In order to resolve a naming convention, the variables in scope are used, together with variables that can be given to the internal scope of the naming convention.